Programming C - Graphic User Interface (GUI) - Exercise
![]()
We need your feedback. Click here!
- GTK is a cross-platform tool for creating graphical user interfaces. [2]
- We will be working with gtk-3.0. Follow the instructions on this page for installation.
- The documentation provides more information on the library widgets and basic examples.
Exercise details
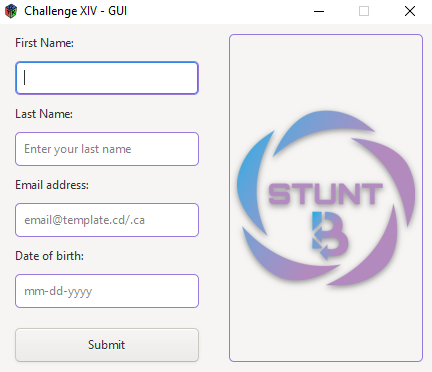
- Create a GUI in which the user's first name, last name, e-mail address and date of birth can be collected.
- This exercise simply implements a basic window with four text inputs whose data is collected and written to a text file.
Follow these steps to create your GUI:
- The main program to launch your GUI runs as follows:
int main(int argc, char *argv[]){
    GtkApplication *app;
    int status;
    app = gtk_application_new ("org.gtk.example", G_APPLICATION_FLAGS_NONE);
    g_signal_connect (app, "activate", G_CALLBACK (activate), NULL);
    status = g_application_run (G_APPLICATION (app), argc, argv);
    g_object_unref (app);
}
See the documentation page for a detailed description of the main structure of the above program.
- This exercise is based on the hello world example.
// entries
GtkWidget* entry_firstname;
GtkWidget* entry_lastname;
GtkWidget* entry_email;
GtkWidget* entry_date_of_birth;

// file manager
FileManager* ptr_fm;- The activate() function is declared as follows:
static void
activate (GtkApplication *app,
          gpointer user_data)
{ ... // add your code here (implementation on the next slides) }- The program window is declared and initialized as follows:
// window
GtkWidget *window;
static FileManager fm = {"data",  "day30_data.txt"};
ptr_fm = &fm;
// initialize the file manager
init(ptr_fm);
// initialize the file titles
add_content_in_file(ptr_fm, "First name\t\tLast name\t\tEmail address\t\tDate of birth\n");
window = gtk_application_window_new(app);
gtk_window_set_title(GTK_WINDOW (window), "Challenge XIV - GUI");
gtk_window_set_default_size(GTK_WINDOW (window), 400, 250); // width: 400px - height: 250px
gtk_window_set_resizable(GTK_WINDOW(window), 0);            // the window can not be resized
gtk_container_set_border_width(GTK_CONTAINER(window), 10); // spacing on the window border- The window is divided into one row and two columns. The left-hand column is the input container, label and button, while the right-hand column is the image.
- The box on the left is declared as follows:
input_box = gtk_box_new (GTK_ORIENTATION_VERTICAL, 10);
 gtk_widget_set_margin_start(input_box, 5); // margin left
gtk_widget_set_margin_end(input_box, 5); // margin right- The first name and wording are entered as follows:
entry_firstname = gtk_entry_new(); // entry
gtk_entry_set_placeholder_text(GTK_ENTRY(entry_firstname), "Enter your first name");
gtk_entry_set_max_length(GTK_ENTRY(entry_firstname), 50);
label_firstname = gtk_label_new("First Name:"); // entry label
gtk_label_set_xalign(GTK_LABEL(label_firstname), 0);- An entry with the above label can be added to the box container as follows:
gtk_container_add (GTK_CONTAINER (input_box), label_firstname);
gtk_container_add (GTK_CONTAINER (input_box), entry_firstname);- The grid configures child widgets with rows and columns. In our case, we use it to divide GUI into one layer and two layers.
- The main grid is added to the main window as follows:
main_grid = gtk_grid_new();
gtk_grid_set_column_spacing(GTK_GRID(main_grid), 25);
gtk_grid_set_column_homogeneous(GTK_GRID(main_grid), 1);
// add the components to the main grid
// attach at position (0,0) for 1 row and 1 column
gtk_grid_attach(GTK_GRID(main_grid), input_box, 0, 0, 1, 1);
// attach img_display on the right of input_box for 1 row and 1 column
gtk_grid_attach_next_to(GTK_GRID(main_grid), img_display, input_box, 1, 1, 1);
// add the grid to the main window
gtk_container_add (GTK_CONTAINER(window), main_grid);- The submit button and its handler are initialized as follows:
button = gtk_button_new_with_label("Submit");
 // When the button receives the "clicked" signal, it will call the
 // display_message() method
 g_signal_connect (button, "clicked", G_CALLBACK (display_message), NULL);
gtk_widget_set_margin_top(button, 10); // margin top- The above button can be added to the toolbox as follows:
gtk_container_add (GTK_CONTAINER (input_box), button);- The display_message() function is implemented as follows:
static void
display_message (GtkWidget *widget,
                 gpointer   data)
{
  const gchar* entry_fname_txt, entry_lname_txt, entry_email_txt, entry_dofb_txt;
  // get the texts from the entries
  entry_fname_txt = gtk_entry_get_text (GTK_ENTRY (entry_firstname));
  entry_lname_txt = gtk_entry_get_text (GTK_ENTRY (entry_lastname));
  entry_email_txt = gtk_entry_get_text (GTK_ENTRY (entry_email));
  entry_dofb_txt  = gtk_entry_get_text (GTK_ENTRY (entry_date_of_birth));
  g_print("> Submit button clicked!\n");
  g_print("\n*** Displaying collected entries' values  ***\n");
  g_print("> First name: %s\n", entry_fname_txt);
  g_print("> Last name: %s\n", entry_lname_txt);
  g_print("> Email address: %s\n", entry_email_txt);
  g_print("> Date of birth (mm-dd-yyyy): %s\n", entry_dofb_txt);
}- All widgets added to a window must be displayed with gtk_widget_show_all(window).
Here are the results of your program
- We can offer you one or two challenges and/or modules per week.
- Detailed explanations can be provided by the teacher if you get lost with the slides.
- That said, here's your schedule:
- Week 1: Introduction - Data types - Tasks - Challenge I - Challenge II - Challenge III
- Week 2: Conditionals and Booleans - Loops - Tables - Challenge IV
- Week 3: Indicator - Challenge V
- Week 4: Challenge VI - Challenge VII
- Week 5: File management - Gnuplot - Extracting data from the web with C - Challenge VIII
- Week 6: Challenge IX - Challenge X
- Week 7: Challenge XI - Challenge XII
- Week 8: Challenge XIII
- Week 9: C - MySQL
- Week 10: Challenge XIV
Here are the results of your program
Our company offers online and in-person C training. Register now and join the community.
References:
- [1] 'Gtk': https://www.gtk.org/
- [2] 'Gtk': https://gitlab.gnome.org/GNOME/gtk